I've been a little MIA with blog posts lately. There is a very, super, fantastically great reason why, though...
I'm getting my very own shop to sell at!!!
A local boutique, here in Fremont, contacted me asking if I was interested in selling there. I went in to talk to her & she had an entire room for me to use!!! I am beyond excited & a tiny bit fearful. Since the fundraiser I did in June, my inventory has been pretty wiped out (which is a great thing) but I've been working like crazy to have enough pieces to fill this room.
So... Starting Saturday, July13th, come check out Blue Hydrangea Furniture at Unique Boutique in Fremont!
Tuesday, July 9, 2013
Tuesday, June 11, 2013
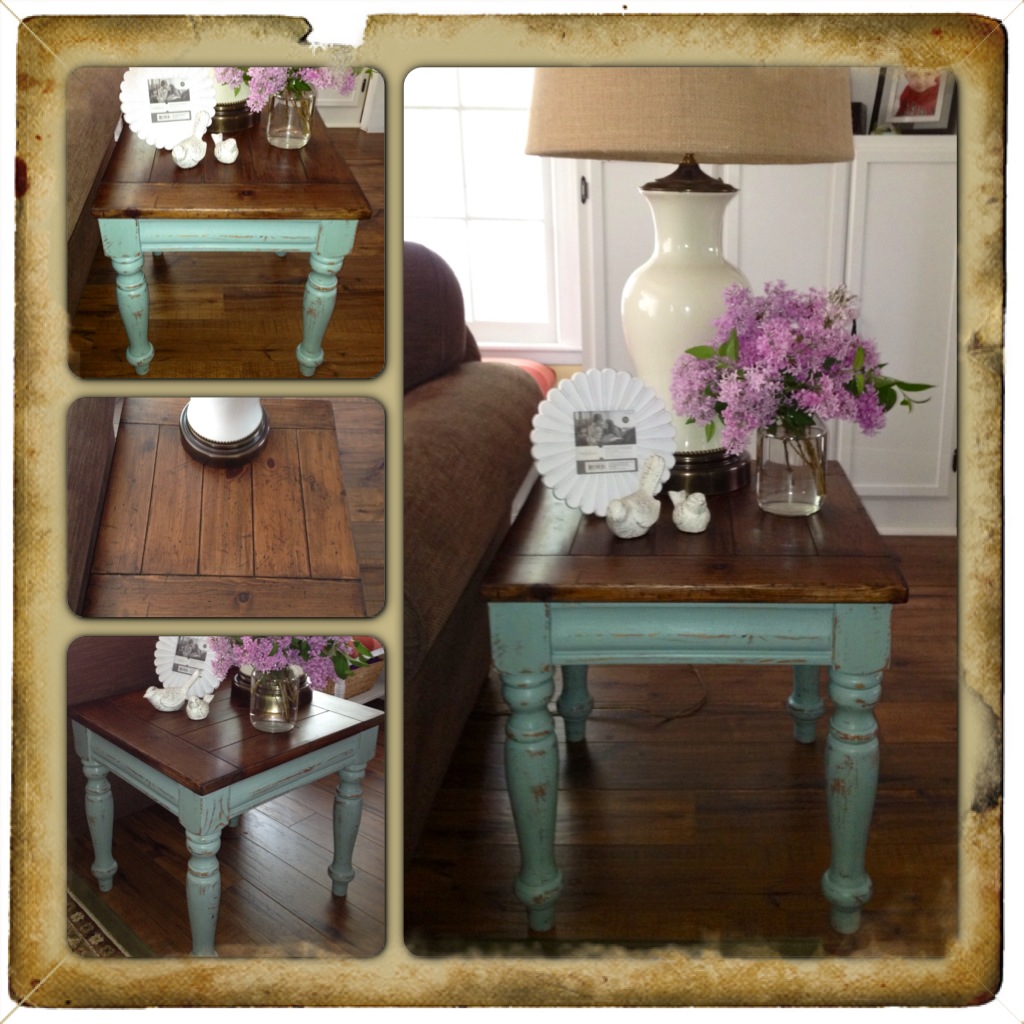
Wood Top - Blue Legs
This one turned out better than I imagined....

So my friend messaged me and said "Hey, I have this table for you, just take it or I'm throwing it away... I'll drop it over at your house." My favorite kind of table... FREE!

It was in decent shape, but the color, Oy! So very orange. The 90's were a hard decade for furniture, if you ask me.
So... what to do.... Stain the top & paint the bottom! I've had great luck with this stripper, so it has become my go-to.

Waiting for it to work... I'm not the most patient person in the world.

I let the stripper sit for an hour and it came off like a dream!

All cleaned off and washed down. I let it dry overnight before sanding and staining.

I sanded with a 150 grit, then a 220 to make it nice and smooth to the tough. I didn't work on getting out too many scratches out because I wanted it to look a little pallet/planky/barnwood esque.
I used Minwax Dark Walnut stain and did 2 coats. Once dry, I taped off the legs and sprayed on 2 coats of polyurethane spray in Satin finish.
I used polyurethane spray instead of Annie Sloan wax, because wax would make a foggy finish over the stain. Not sure of the chemistry behind it, but I have had it happen with this stain before ;)

So the top was done... What color should I paint the legs?

I'm sure you'll be shocked here... Annie Sloan "Duck Egg" it is!

I then distressed and waxed the legs.

A good view of the stained top.

I could have sold this table 5 times over already. She now resides with an old college pal, Chris.
Wood top with painted legs seems to be a trend right now. What do you think of it? Feel free to post links in the comments to any success stories you have had with wood/paint combos!
Linking up here:
http://www.lizmarieblog.com/2013/06/inspire-me-linky-party-15/
Red, White, & Blue Fireplace Mantle
I've been asked about the details of my latest mantle decor, so here goes...

There are quite a few elements that stayed put from the last mantle... The old chippy window, shutters, blue metal milk can, wood cheese box, and wreath were all mentioned in my Easter Mantle post.
The bunting is made from jute webbing, usually used for furniture reupholstering. I loved the color and texture and thought it would made a neat bunting, plus it's on $.99 a yard at Hobby Lobby! I had the jute cording and Fabri-Tac glue. The bunting cost less than $1.50 to make!

I made one flag and then used it as a template for the others.

Cutting & assembling over coffee ;)


The frames are from the Threshold line at Target. No, I'm not being paid, I just really love about everything from that line. The larger one looks a little like wainscoting. I found a free printable on pinterest and adjusted the color a bit so it would match my decor a little better. I cut the flag out and centered it on a piece of burlap just to give it a bit of texture.

The smaller frame is fan shaped, also from the Threshold line. I printed off a patriotic star that I made using power point.

I added some very cheap, like $.99 for the bunch cheap, red geraniums from Michael's, to the cheese box for a pop of red.

A better view of my clearance bird cage. I really liked the color. I didn't want to do bright red, white, & blue, but more of a grey, muted blue to go better with my existing home decor.

I had a hole on the right side, so I took a mason jar from my craft room, tied some ribbon that I had on hand around it, put cream hydrangeas in it, and set it on some books that I had on my book shelves.

The blue birdcage was a $6 Hobby Lobby clearance score. The dark red berries are also from Hobby Lobby and I believe they were 50% off and only $.99 each (I used 4) and just sort of stuck them in there for some color.
My lazy side it really hoping that this mantle will get me through the 4th of July. I have the feeling that this summer is going to pass in the blink of an eye. I still haven't figured out where April and May went.
Do you put patriotic decor up around your home or do you keep it to one area like a mantle or front porch?
There are quite a few elements that stayed put from the last mantle... The old chippy window, shutters, blue metal milk can, wood cheese box, and wreath were all mentioned in my Easter Mantle post.
The bunting is made from jute webbing, usually used for furniture reupholstering. I loved the color and texture and thought it would made a neat bunting, plus it's on $.99 a yard at Hobby Lobby! I had the jute cording and Fabri-Tac glue. The bunting cost less than $1.50 to make!
I made one flag and then used it as a template for the others.
Cutting & assembling over coffee ;)
I used Fabri-Tac to glue the webbing to the just rope. I got both from Hobby Lobby.
The frames are from the Threshold line at Target. No, I'm not being paid, I just really love about everything from that line. The larger one looks a little like wainscoting. I found a free printable on pinterest and adjusted the color a bit so it would match my decor a little better. I cut the flag out and centered it on a piece of burlap just to give it a bit of texture.
The smaller frame is fan shaped, also from the Threshold line. I printed off a patriotic star that I made using power point.
I added some very cheap, like $.99 for the bunch cheap, red geraniums from Michael's, to the cheese box for a pop of red.
A better view of my clearance bird cage. I really liked the color. I didn't want to do bright red, white, & blue, but more of a grey, muted blue to go better with my existing home decor.
I had a hole on the right side, so I took a mason jar from my craft room, tied some ribbon that I had on hand around it, put cream hydrangeas in it, and set it on some books that I had on my book shelves.
The blue birdcage was a $6 Hobby Lobby clearance score. The dark red berries are also from Hobby Lobby and I believe they were 50% off and only $.99 each (I used 4) and just sort of stuck them in there for some color.
My lazy side it really hoping that this mantle will get me through the 4th of July. I have the feeling that this summer is going to pass in the blink of an eye. I still haven't figured out where April and May went.
Do you put patriotic decor up around your home or do you keep it to one area like a mantle or front porch?
Chevron Top Side Table
To date, this side table is one of my favorite pieces. It now lives in my friend Lauren's house.
 Here is the before pic. I found this one at my local Estate Sale Store. It's always hit or miss. This particular day, I left with 3 tables. Yay!
I have had this table for probably 3 months and just wasn't sure what to do with it. Sometimes you just have to wait for them to tell you. No, I'm not crazy!

The Process...
I painted the whole table with an off white that I made mixing Annie Sloan Chalk Paints in "Pure White" with a small amount of "French Linen" the make the white not so stark, but still pretty white. Once dry, I made a 2 inch grid on the top of the table.

Then I started taping the diagonal corner to corner. THIS PROCESS IS TEDIOUS, BUT SOOOO WORTH IT! I had lots of help from my littles. ;)

Then I taped the other way. I told you... tedious.

Then I took a straight edge and a blade and CAREFULLY & GENTLY cut out the chevron pattern. I did this one in 2 sittings because my kids were bugging me to take them to the park. :)

Doing it this way makes a very clean pattern. I haven't tried using a stencil, but might attempt it after this. I then painted Annie Sloan "Duck Egg" on top and painted the lower shelves solid duck egg blue.


I removed the tape once I finished painting, while still wet. carefully. Make sure to have a place to put your painty, messy tape, like a plastic Walmart bag or something.

Once dry, I went to town distressing it. Then I waxed with Clear Annie Sloan wax and buffed to shine. This one turned out better than I imagined!

So... Is chevron a short-lived trend or here to stay? Who out there hast attempted to chevron something in your home? Any tips?
Linking up here:
http://www.lizmarieblog.com/2013/06/inspire-me-linky-party-15/
I have had this table for probably 3 months and just wasn't sure what to do with it. Sometimes you just have to wait for them to tell you. No, I'm not crazy!
The Process...
I painted the whole table with an off white that I made mixing Annie Sloan Chalk Paints in "Pure White" with a small amount of "French Linen" the make the white not so stark, but still pretty white. Once dry, I made a 2 inch grid on the top of the table.
Then I started taping the diagonal corner to corner. THIS PROCESS IS TEDIOUS, BUT SOOOO WORTH IT! I had lots of help from my littles. ;)
Then I taped the other way. I told you... tedious.
Then I took a straight edge and a blade and CAREFULLY & GENTLY cut out the chevron pattern. I did this one in 2 sittings because my kids were bugging me to take them to the park. :)
Doing it this way makes a very clean pattern. I haven't tried using a stencil, but might attempt it after this. I then painted Annie Sloan "Duck Egg" on top and painted the lower shelves solid duck egg blue.
I removed the tape once I finished painting, while still wet. carefully. Make sure to have a place to put your painty, messy tape, like a plastic Walmart bag or something.
Once dry, I went to town distressing it. Then I waxed with Clear Annie Sloan wax and buffed to shine. This one turned out better than I imagined!
So... Is chevron a short-lived trend or here to stay? Who out there hast attempted to chevron something in your home? Any tips?
Linking up here:
http://www.lizmarieblog.com/2013/06/inspire-me-linky-party-15/
Saturday, May 18, 2013
Perfect Little Greige Side Table

Last week, I went to a fantastic estate sale. I could have easily spent 3 hours there. The entire upper level of the building was stacked antique furniture. AMAZING! Luckily, for my wallet, my hubby kept texting me to see where I was & how much longer. I only brought home a small pile ;) This was one of my finds.

The top was a little rough. Perfect for painting.

When using Annie Sloan Chalk Paint, you don't need to sand or prime, so a painting I did go.
One nice coat of French Linen.

Then I taped off stripes on the top and painted them a creamy white that I made mixing Annie Sloan "Pure White" with a little bit of French Linen mixed in.

I always have the best luck when I remove the tape when the paint is still wet, just proceed with caution. I also decided it needed a pop of the creamy white color on the bottom, so I painted the cross braces the same cream color. Then I let it all dry and went to work distressing with 150 grit sandpaper and then 220 to smooth things out. Once smooth, I gave it a couple of coats of Annie Sloan Clear Wax and buffed to shine.
Some close-ups...


Do you have a favorite "go to" color you usually end up painting things in your home? I always lean toward grey-based blues and greens. My husband actually said I wasn't allowed to paint anymore rooms in the house green. We'll see... ;)
I'm linked up here...
Liz Marie Blog
Friday, May 17, 2013
Coral Pink Stenciled Side Table

I found this beauty at an online garage sale. Isn't she pretty? Not so much...

I gave her a good sanding and then mixed up some homemade chalk paint using this recipe. I went with chocolate brown because I planned on doing some distressing and I wanted the dark brown to show through the coral pink.

Then I forgot to take pictures... Sorry :(
I mixed up another batch of chalk paint using coral pink paint instead and gave it one coat and let dry. Then I used a set of Martha Stewart stencils on the top and the shelf below. I used Annie Sloan Chalk Paint in "Pure White" for the stenciling because it was handy. Then I distressed using 150 grit sandpaper and then 220 grit to smooth it out. I used Annie Sloan clear wax and then a little of her dark wax in the grooves to make it look aged. Then another coat of clear on top and buffed with a clean rag.
This table is for sale on my facebook page.


Remoldelaholic
Liz Marie Blog
Monday, May 6, 2013
My Blissful Space Giveaway!
Check out my friend, Crystal's blog, My Blissful Space... She has great ideas and tips for organizing, home decor, etc. She'll even come organize for you! Plus, she's doing a great giveaway! Check it out!
http://www.myblissfulspace.com/2013/05/10000-page-views-and-giveaway.html
Subscribe to:
Posts (Atom)